(Newswire.net — June 8, 2021) — LinkedIn is an amazing platform. If you are in the business-to-business sector then you are really missing a big opportunity if you are not investing time and effort into LinkedIn and leveraging its power.
LinkedIn is currently pushing for market share as a social media and content platform. This means that the “organic reach” is relatively vast, and you can reach thousands of people and generate lots of leads without having to spend money on advertising.
Having said that, LinkedIn Ads are extremely powerful, and testing them out is a must for almost any business. Unlike platforms such as Facebook, all users are incentivized to complete all of their employment details. With this data available, you can target ads specifically at CEOs, decision-makers, and your target audience.
If you are not already convinced, consider that LinkedIn users are generally white-collar professionals, and as such, they have approximately twice the buying power of the average Facebook user.
Before you begin using LinkedIn Ads, it’s a good idea to have the LinkedIn tracking code installed. You can do this using Google Tag Manager or hire someone to do it for you for a relatively small fee, using PeoplePerHour or UpWork to find a relevant freelancer.
Warm Up Your Target Audience
One more thing to consider before starting a LinkedIn Ads campaign – is what assets do you have? Images, videos, infographics, and in-depth blog posts, and eBooks. What do you have to create an eye-catching ad and what do you have that can offer value and be helpful to your target audience?
As with all social media ads, you will generally want to offer something of value with your first set of ads – like a free tool, or a useful article that covers your target audience’s pain points. You can then remarket to those users who interacted with your first ad. Once they know who you are and appreciate the content or tool that you provided them with, they are more likely to buy from you and you can directly push a sale.
So warm up your audience! Webinars also work well, but they are relatively long, and users will have to commit time and effort. This can work well but experiment with free downloads, infographics, short videos, and visual step-by-step guides.
Getting Started
The first thing you need to do is create a LinkedIn account. Go to LinkedIn.com and create a basic account.
You will also need to create a LinkedIn company page. You can do that in a couple of minutes with this step by step video tutorial.
After that, on the right-hand side, near the top, you should see an icon of a dartboard, above text that says “Advertise”. Click on the icon and you will be taken to the LinkedIn Campaign Manager.
If you want to start advertising, click on “Create Account” on the left-hand side.
Give your advertising account a relevant name, choose your country’s currency and enter the URL of your LinkedIn Company page.
Then click “Save”.
Your account should now be successfully set up.
Creating a Campaign
In the Campaign Manager section of LinkedIn, click on the name of your new account.
The hierarchy of LinkedIn ads is similar to Google Ads.
At the top of the account, you have “Campaign Groups”, which contain “campaigns”, which in turn contain “ads”.
LinkedIn will automatically create a campaign group, named “Default Campaign Group”. Click on the “Default Campaign Group” text and on the next page, click “Create campaign”.
You will be taken to a new page, where you will be prompted to choose an objective.
If you hover the mouse cursor over each objective, LinkedIn will explain what each objective means.

Choose an Audience
Once you have chosen your objective, you will need to choose your audience. If you have created an audience in the past, then you will be able to use “saved audiences”.
To the right of “Saved Audiences”, you can click to choose a “LinkedIn Audience”, which are predefined audiences – users grouped on work and demographic details.
For example, you can target people who are experts in Bitcoin, or Customer Experience professionals.
If you don’t have any customer data or any saved audiences that you want to use, then scroll down and click on “Audience Attributes”. You can then create your own audience based on LinkedIn’s targeting options.
There are actually around 200 targeting options when it comes to making sure that your ads are seen by your target audience. LinkedIn allows you to target people by factors including:
- Interests & Traits
- Demographics & Location
- Experience
- Education
- Company
Each different targeting criteria has many elements of targeting within it. for example, you can target people who work for specific companies, or people who work for companies with a certain number of employees or company industry. You can even target companies based on their growth rate, year on year.
https://www.youtube.com/watch?v=PCsAMLf9dPQ
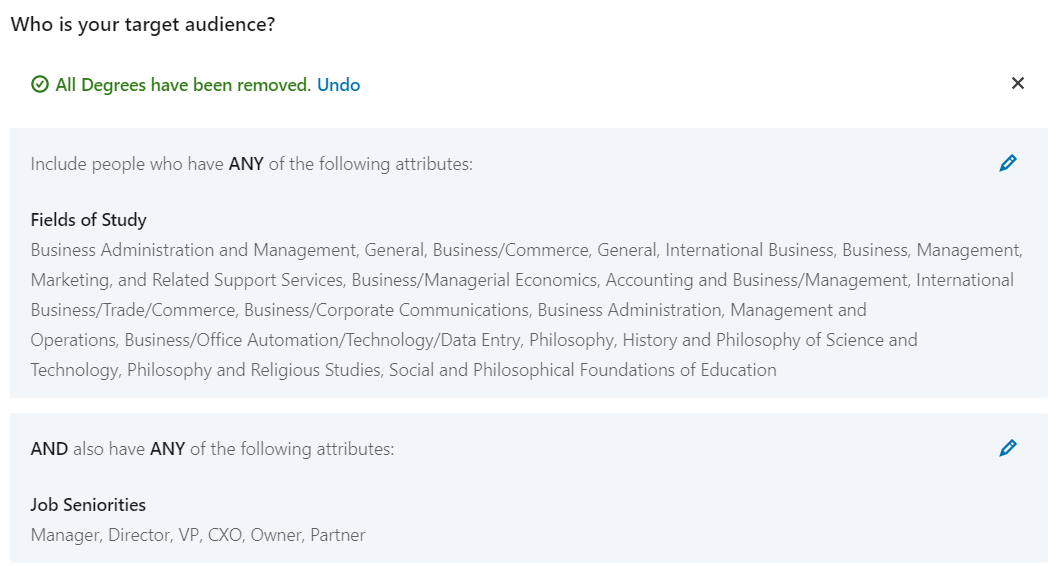
Spend lots of time learning about and pinpointing your ideal target audience, as LinkedIn has a tremendous ability to target specific users.
Below I am targeting people with degrees in business or philosophical related fields, who are at manager seniority or above in their current role.
If you wish to remove any criteria, simply click the garbage can icon.
Location Targeting
Still building our audiences, next we need to optimize location targeting.
You can target certain cities, states, and countries. You can also exclude particular areas. For example, if you want to target the entire United States, but you don’t provide your service in Alaska, you can exclude users based in Alaska.
You generally want to untick the option to use the LinkedIn expansion pack. Further down you should untick the option to “Enable the LinkedIn Audience Network” if it is your first campaign.
Ad Format
Next, you will need to choose an ad format.
The ad formats available will depend on the objective that you selected at the beginning of creating a new campaign.
Single Image Ad – this shows on your newsfeed as your scroll down, as is an image with some text.
Carousel Ad – this is similar to a single image ad, but with multiple images
Video Ad – also featured in the newsfeed, but it is a video format ad.
Text Ad – these shown on the right-hand side of a usersLinkedIn interface, or at the very top.
Spotlight Ad – this shows on the right-hand side, near the top. It stays at the top as users scroll down their newsfeed
Message Ad – These ads show in people’s inboxes on LinkedIn. You send people a message, with a Call to Action (CTA) at the bottom, such as “learn more”
Conversation Ad – This also shows in someone’s inbox. The ad usually starts with a question and presents the user with a number of options to choose from.
Budget & Scheduling
Set a daily and lifetime budget. For example, if you can afford or want to use $20 per day on this campaign, then enter that as the daily budget. If your overall budget for the campaign is $250, then put that as the lifetime budget.
Also, set a start and end date for your campaign.
Bid Type
For your first campaign, it is recommended that you use the “Target CPC Bid” option.
This gives you more control over how much you pay per click of your ad.
You can then enter how much you are willing to pay per click. The more targeted your ad and audience, the more you can be willing to pay.
Finally, if you have conversion tracking set up, you can choose a conversion. For more information on this, watch this YouTube tutorial.
Click “next” when you are done.
Creating a LinkedIn Ad
If this is your first ad, then click on “Create new ad”.
In this instance, we will look at how to create a Single Image Ad.
Give the ad a name – something descriptive like “clicks to website ad 1” or “eBook offer 1”
The “Introductory Text” will show on your ad, under the image.
Think of a way to use the text to grab the attention of a LinkedIn user – asking a question or addressing a known pain-point that your target market has, can be good starting points.
For example, if your “warm-up” advert offers a free guide to the most used formulas in Excel, then the ad text could be something like “Are you new to Excel? Download our free cheat sheet and get to grips with all the common and most useful Excel formulas, complete with spreadsheets with built-in examples that you can use”. Using bullet points that outline the benefits can also be effective.
Enter a tracking URL – if you are tracking your campaigns, which you should be! You can do this easily with the Google Tracking URL webpage. If your ads are driving phone calls to your business then you may need a tool such as Ruler Analytics and a phone answering service such as Moneypenny or workwithme.
Next, add an image. The image is really important. Faces can work well, as faces tend to attract our attention in ads. Images are really important, for more ideas see this YouTube video.
Add your headline, for example, “Free Excel Beginner’s Cheat Sheet” and choose a call to action such as “Learn More”.
When you are happy with your ad, click “create” and keep “add to campaign” ticked.
You can now create another ad. This is always a good idea as you can test to see which type of ads work best. It can be a good idea to create the same ad again but change the main image. This can help you refine and determine which images work the best.
When all the ads are ready click “Launch campaign”.
Conclusion
When your campaign is launched, keep a close eye on which ads are performing well, and don’t be afraid to pause the campaign if it doesn’t appear to be working. Tracking is really important, so make sure you can calculate cost per conversion and other important metrics.
Once your set of “warm-up ads” are live, you can look to remarket with an offer or to push a sale. In order to do this, you will need all of your tracking set up properly.